|
|
Struthiomimus
Out
of the box review!

 Well this is the 2nd kit that I have
gotten that Steve has designed (this is his 3rd
release)
This one was done with Matt Manit of Little
Monsters Presents.
They teamed up to form Primeval Plastics.
I hope they keep working together for a long
time. As much as I loved the protoceratops, this
one surpasses it in several ways. While the
subject itself isn't really up my alley, and it
doesn't have the moveable joints like the proto,
it captures the PS feel even more.
Now that I have teased you a
little, lets get on with the review and you can
decide for yourself.
Or, you can jump down to the bottom for my summary.
(but not before a quick word on photographing
purple parts. Aaaaaagh!
You will notice that most of the pics, the purple
will look more pinkish than purple.
 |
On the left you can see the actual
color. On the right you can see what it
looks
like in most of the pics
|
 |
The main reason for the problem
was lighting. I tried all the background colors I
had handy.
The gray sucked up too much of the light and left
things too dark to see.
The white caused a glare and washed out the
detail.
That only left my blue which caused the purple to
look pink.
|

Here is the box, that arrived inside a priority
box with plenty of peanuts.
(hey, got to give props to good shipping habits
also)

The kit is 15 pieces.
And as you can see, they are well packed.
Many baggies to make sure nothing gets lost or
banged around.

Well, let's start with the tree.
The trunk is 2 pieces. That fit nicely, both with
each other and the base.
Then below you can see both sides of the leaf
cluster.
Obviously drawing from the jungle swamp, but with
a little something more to it.
 
So the tree is nicely detailed and has that
familiar PS feel while still remaing very 'real'
looking.
Nice to see so much attention paid to what is
realistically an incidental piece.
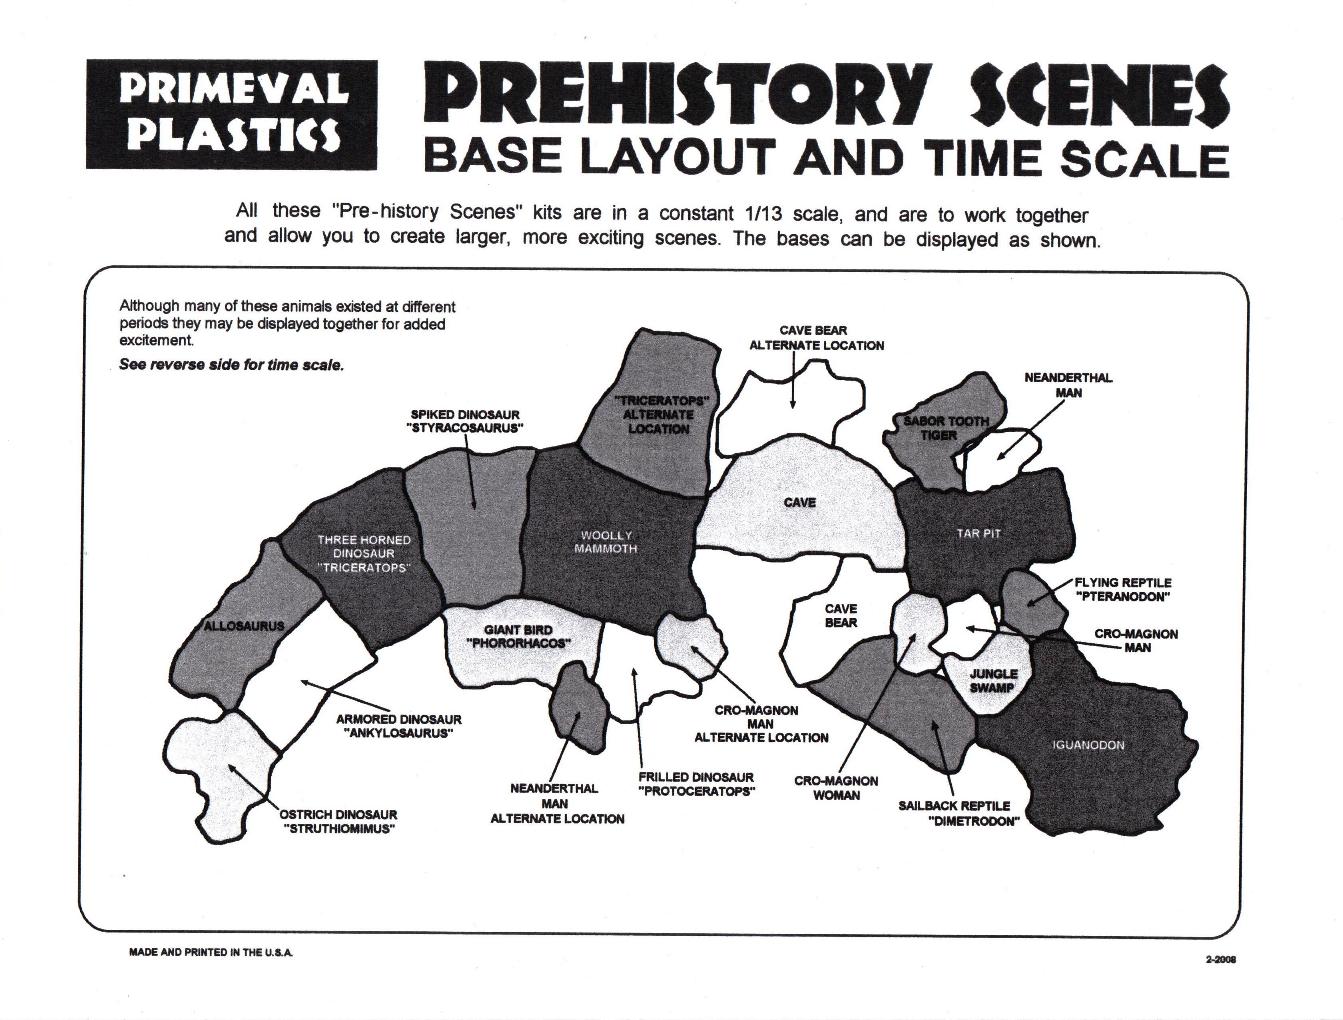
On to the base.
2 pieces

A very adiquate base that has a lot of nice
detail that you don't notice until you look.
Nice texture, little plants, rocks, the nest of
course.
 
Then the part that really blew me away.
Look at the picture below, with this butted up to
the armored dino base.
The texture and details line up exaxtly with it!
I was amazed and had to call my daughter down
from her room to come check it out.
Really SWEET attention to detail.

|

Ok, on to the legs.
We'll start with the left one.
This is the 2 piece raised leg.
Again nicely keyed to fit perfectly/
 
   
Now for the right 'standing leg'
 
Yeah, I took a bunch more pics of this leg.
But I wanted you to see all the sweet detail on
it, and it was easier to show on this leg than
the left one. Also this one has the plant-type
stuff under the foot that I wanted to get shots
of from a few different sides.
 
|
 
The arms and hands continue the same detailed
skin textures.
Again, keyed to fit perfectly to the body.
  
Sorry, only one pic of the tail. All the others
came out blurry.
But you can see the textures. It too is keyed to
fit to the body easily.
 
The head is small, so kind of hard to get a good
detailed shot.
Hopefully you can make out all the fun stuff
going on.
Pupils in the eyes. Tongue and other mouth
details.
The feirce, yet not to menacing facial expression
(which really screams PS to me. You can make it
look like it has a goofy grin, or like it is
about to rip your head off)

 
The nameplate and egg are cleanly cast as well.
Now on to the main piece!
The body.


Nice flowing form. Great skin details, and nice
muscle structure.
Notice how it is designed to help hide the seams
where the arms and legs connect.

Here is the instruction sheet that came with
mine.
The new one that looks like an actual 1972 Aurora
instruction isn't quite done yet.
I will be getting one of those when they are
ready.
|
Summary

So, you get 15 pieces.
All, are nicely sculpted, cleanly cast with crisp
detail.
The fit seems to ve really good as well. Looks
like nice tight seams
that should be easy to clean up.
 
The biggest thing for me about this kit, is the
way it fits with the line.
Both the way the base matches up and blends right
in, and the general size and feel of the kit.
It just feels PS to me.
As I mentioned earlier, this is Steve's 3rd kit,
and it shows.
He contintues to make strides in nailing that PS
experience even though the kit is resin.
I think teaming with Matt also helped seal the
deal on this kit.
Not a crit against Steve's previous sculptor. The
previous offerings are great kits too.
I just think this one brings the whole package.
Weather it was Steve vision, or Matt's execution
I don't know, but it just clicks.Ok, I have
gushed enough. I have told you all the great
stuff about this kit.
Now for the other side of the coin. The
drawbacks.
Not a whole lot to say against it, but here are a
few minor quibbles.
The first thing I noticed, was that the keys
are a bit long. On both the arms and the legs.
They need to be trimmed a little.
Not a huge issue and easily taken care of, but I
thought is should be mentioned.
The tree. When putting the 2 pieces of the
trunk together,
it appears the texture only lines up when you
have it lined up one specific way.
Not a big deal, but the key is a round pin, so it
doesn't help you line up that texture at all.
Again, minor, but worth noting.
|
The only real
issue with the kit that I got was one casting
flaw.
On the very bottom of the tree.
 
See that void in the peg?
Well, it extends into the tree itself.
Down through that first ring of texture.
 
I took several pictures to show it.
There is a thin skin of resin that you can almost
see through, then that void.As far as casting
issues go, this is very minor.
I packed the void with aves epoxy paste and it is
all fixed up.
There was no loss of detail at all, because that
skin of resin was still intact.
But for those PS fanatics who might not be
familiar with resin, I thought it was worth
pointing out that there can be issues
occasionally with castings. I have no doubt that
if was anyting that was a real issue (lost
detail, incomplete part, etc) an email or phone
call to Matt and there would have been a
replacement part to me in the mail in no time.
And for those who are curious about how
something like this happens,
I think I have an explanation.
Sometimes when parts are cast, you end up with an
air bubble trapped in the resin, or you just come
up a little short on your resin and don't have
enough in the mold to fill the part completely.
The reason this had the skin on it though is
because Matt's caster probably uses a technique
that almost all the good caster use.
They pour a little resin in the mold, and slosh
it round to make sure to fill all the details.
Then they pour the rest of the resin to fill the
mold.
This method ensures that you don't end up with
bubbles or voids in the details of the cast.
Especially with complex shapes, undercuts, or
lots of angles.
As air can get trapped with no way for it to get
out.
Using the slosh method usually all but eliminates
that problem.
As can be seen with this peice.
And now with
instruction sheet!
   
 
|
|